Using Multiple Rates of Pay for Employees
Article ID
11635
Article Name
Using Multiple Rates of Pay for Employees
Created Date
17th October 2016
Product
IRIS PAYE-Master
Problem
PAYE-Master only allows for one pay rate per employee, how can I process an employee with different pay rates.
Resolution
In order to use multiple pay rates for employees we have to use “Additions/Deductions“.
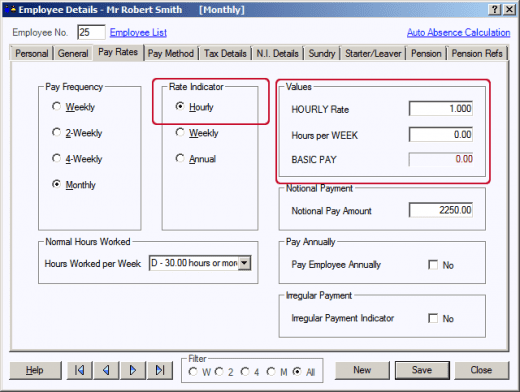
Put all appropriate employees on a pay rate of £1.00 per hour, and zero hours per week/year as follows (for each employee):
- Click on the “Employee” button on the main toolbar to open the Employee window.
- Click on the “Pay Rates” tab and ensure the “Rate Indicator” is set to “Hourly“.
- Type “1” in the HOURLY Rate box, and “0” in the Hours per WEEK (YEAR) box.
- This will result in a basic pay of nil.
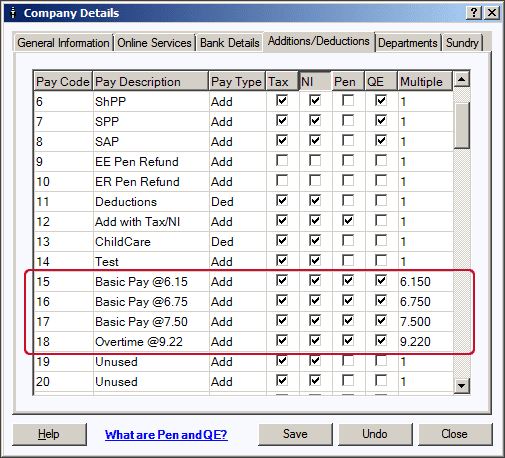
Next, we need to create pay codes, using multiples, that will calculate through to the desired hourly rates:
- Click on the “Company” button on the main toolbar to open the company window.
- Click on the “Additions/Deductions” tab. Pay Codes numbers from 11 to 99 can be modified.
- Simply double-click on the relevant “Pay Description” field, over-type the word Unused with the word or phrase chosen to describe the code. If the code description is applicable to more than one rate, then it is useful to include the hourly rate as part of the description, thus minimising incorrect code selection. Example, Basic Rate 6.75. The pay under this code will be an addition, so “Add” should be set in the Add/Ded field, and the and Tax checkboxes should normally be ticked (and the Pen checkbox if pensionable. If the pay should be considered as Qualifying Earnings for automatic enrolment, tick the QE box). This means the additional pay is subject to tax, NI and pension where applicable. The equivalent rate should then be entered in the “Multiple” column; i.e. if the hourly rate of pay is to be 6.75, enter 6.75 as the multiple; See the follow example:
The last stage is to set up the appropriate code(s) on the pay table of each employee for whom multiple rates apply.
- Click on the “Pay” icon to display the Payroll Processing Toolbar
- Click on the “Variations” button on the Payroll Processing Toolbar.
- The Pay Variations window will be displayed.
- Select the first appropriate employee; the Pay Table tab will be displayed, Assuming the pay rate for the employee has been set up as above, there will be no figures in the Std Amount column (i.e. zero basic pay):
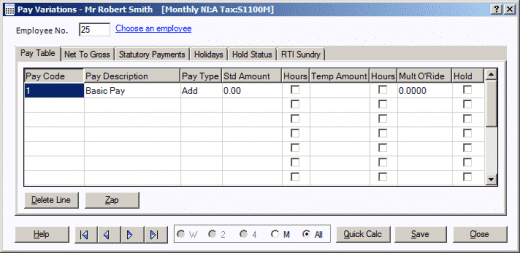
- To prevent an empty Basic Pay line showing on the payslip, select (click to add a tick) in the box in the “Hold” column on the first line.
- To use a new pay code, double-click on the next available line under the “Pay Code” column and select the appropriate code (i.e. one of the codes set up in step 2 above). To select a code, scroll down the list and just click on the code.
- Tick the “Hours” and type in the number of hours you wish to pay against each rate. Any values typed into the “Std Amount” column will be saved and used each pay period, useful if an employee has the same hours each pay period. Values typed into the “Temp Amount” column will only be used this pay period:
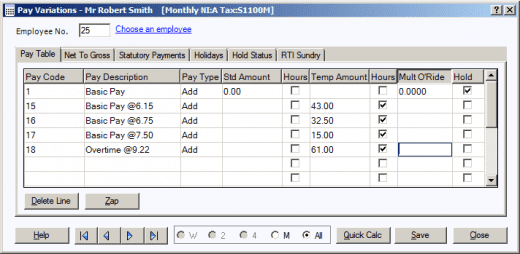
Note: It is important to note at this stage that any entry in the “Temp Amount” column will always override any entry in the “Std Amount” column for each particular code. Also, if an amount of money or number of hours is entered in the “Std Amount” column, the pay and the code will remain on the Pay Table the next time the payroll is run after finalising the current one.
There must be a minimum of 1p for each code on the Pay Table under Std Amount to retain the code. If a code is used on the Pay Table where only a Temp Amount is entered, the whole line (code and amount) will be cleared when the current payroll is finalised.
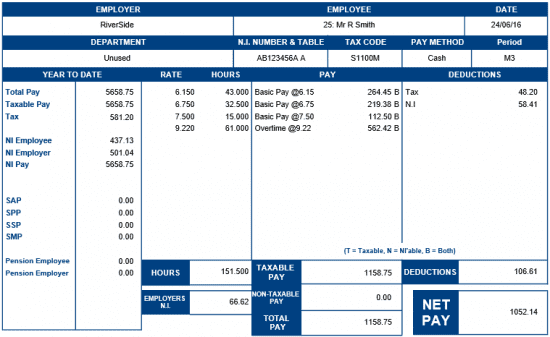
Using the example above, the employee payslips would appear as:
We are sorry you did not find this KB article helpful. Please use the box below to let us know how we can improve it.
