Attachment of Earnings (AEO) Guide - Payroll Business/Bureau Payroll
Article ID
11907
Article Name
Attachment of Earnings (AEO) Guide - Payroll Business/Bureau Payroll
Created Date
16th April 2020
Product
IRIS Payroll Business, IRIS Bureau Payroll
Problem
Details on and assistance with attachment of earnings orders in Payroll Business & Bureau Payroll.
Resolution
In response to the coronavirus outbreak the DWP have asked employers to Suspend Direct Earnings Attachments(DEAs)
For details visit gov.uk here.
For payroll software guides click here.
In the payroll, gross pay is made up of Salary, Hourly Rates, Payments and Deductions, Attachment of Earnings Orders, Pensions and Loans.
In this KB we will explain how to create Attachment of Earnings Orders types.
For details on configuring Salary, Click here
For details on configuring Hourly rates and Overtime Factors, Click here
For details on configuring other Payments or Deductions, Click here
For details on configuring Pensions, Click here
For details on configuring Loans, Click here
Attachment of Earnings (AEO) Guide
IRIS Payroll has the facilities to cope with a variety of attachment of earnings order. Here we will cover:
• Council tax attachments – CTAEO
• Child support agency Deduction from earnings order – DEO(CSA)
• Direct earnings attachment – DEA
• Earnings arrestment orders (Scotland) – EAO
• Fines – fixed deduction AEO.
• Priority Order
• Non-Priority Order – Eg. CAPS (Centralised attachment of earnings payment)
Types of Attachment
The behaviour of the attachment deduction will vary depending on the “Type” selected. It is important that you select the correct type, depending on what attachment instructions you have received.
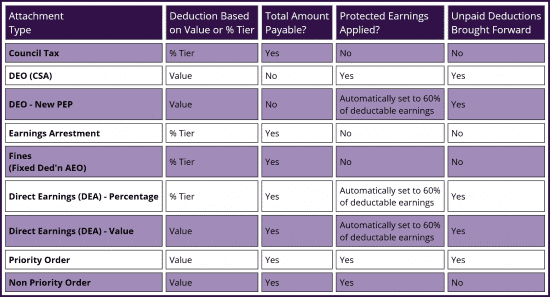
This table summarises the differences between types:
Notes:
• Where designated “% Tier” IRIS Payroll will select the correct deduction percentage based on an employees after tax/NI earnings. These % tier bandings are specified by HMRC, the details can be found in the “HMRC” tab in payroll.
• Where total amount payable is designated “No”, these are considered ongoing deductions with no total balance for the employee to pay back. These should be continued until the issuing body sends a stop deduction notification.
• Protected earnings specify a lower limit of net pay. If an attachment uses protected earnings it will not take any deduction that would cause the employees net pay to fall below this value.
• Where unpaid deductions brought forward is designated “Yes”, any amount that cannot be taken from an employee due to protected earnings will be carried forward to future pay periods.
Setting up an Agency/Beneficiary
Before configuring the employee deduction you should save the details of the beneficiary for the attachment in IRIS Payroll.
To set up new beneficiary details go to “Company” > “Payments & Deductions” > “AEO/Beneficiary Details”:

Click “Add New“
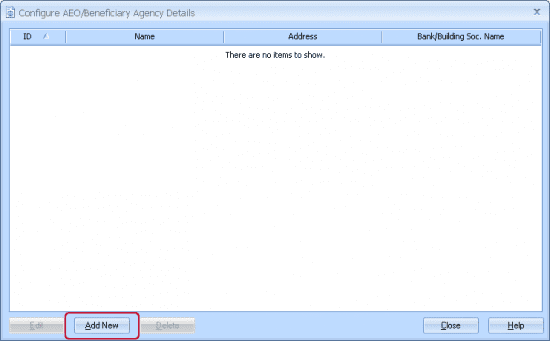
Fill in as many details as you can about the beneficiary and click “Save“.
Making an Attachment of Earnings type available to use
Before you can assign an employee an AEO you will need to make sure it is configured for use in your software.
By default the system will make available options for:
• Council Tax
• DEO CSA
• Earnings Arrestment
• Fines (Fixed Deduction AEO)
• Admin Fee
If you have received an instruction to take deductions for any other type of AEO you will first need to add the appropriate type to the “Configure Attachment of Earnings Orders” list.
Go to “Company” > “Payments & Deductions” > “Configure Attachment of Earnings Orders”.
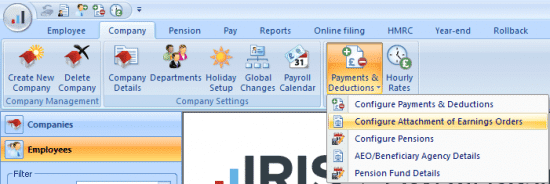
Click “Add New“
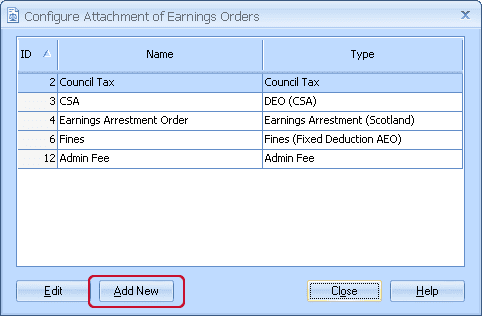
On the next window type in a name for the deduction, this is what will show on the employee payslips. From the drop down menu select the type of attachment you want to use:
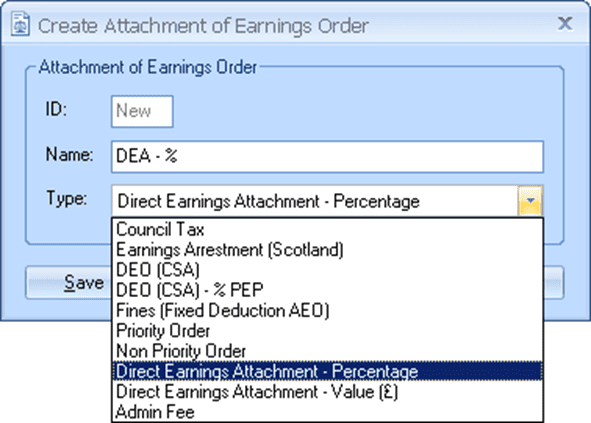
Click “Save“. The attachment is ready to be assigned to an employee.
Assigning an Attachment to an Employee
Now we have set up the beneficiary and the attachment type we are ready to apply this to an employees’ record.
Attachment of Earnings configuration tab
Attachment of earnings orders are configured in employee details “AEO” tab, this is one of the sections under “Pay Elements”.
To access this, double click on the employee in the left-hand side bar. Open the “Pay Elements” tab. Then open the “AEO” tab:
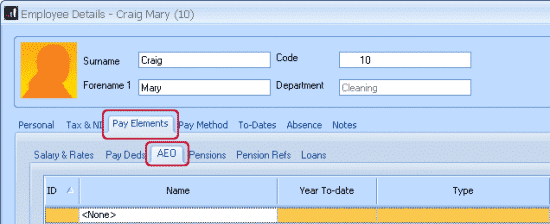
To add an AEO, click on the text <None> and select the appropriate attachment option from the drop down menu.
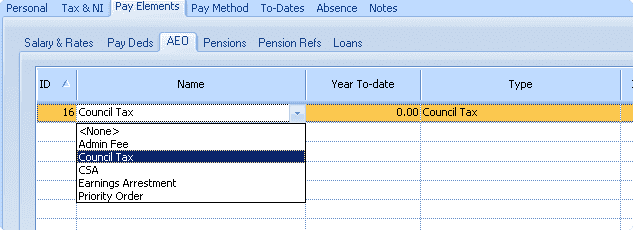
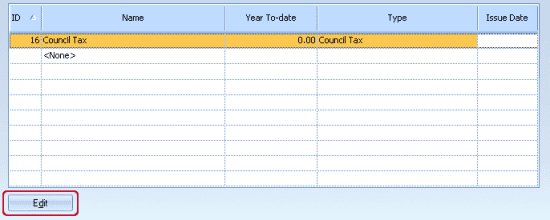
With the correct AEO type showing in the list we can now edit the specific details for this employee. Click on the appropriate line for the AEO you wish to configure and then click “Edit”
You will then see the AEO details window where we can configure further details to match the instruction to make deduction e.g. Issue Date, Outstanding Balance, Protected Earnings, etc.
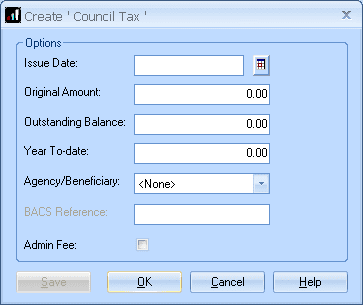
Configuring Employees’ Attachments
Council Tax (CTAEO):
On the employees’ AEO tab:
• Select the “Council Tax” AEO type.
• Highlight the new council tax entry and click “Edit”
• Set the “Issue Date” as per your instruction to make a deduction.
• Set “Original Amount” to the total amount the employee has to repay.
• Set “Outstanding Balance” to the amount the employee has left to pay (when setting up a new AEO “Original Amount” and “Outstanding Balance” will normally be the same.)
• Select the “Agency/Beneficiary” you have set up
• Tick “Admin Fee” if you wish to charge the employee the allowed £1 administration fee.
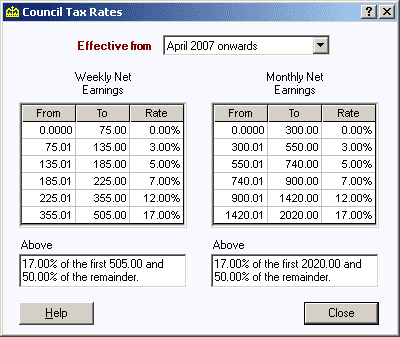
• IRIS Payroll will use the following % tier selection:
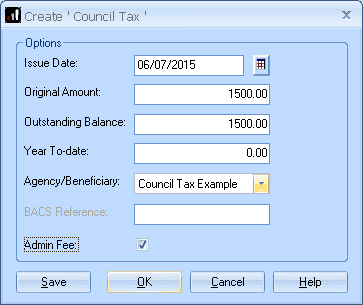
Save these details and continue running payroll as normal. IRIS Payroll will calculate the appropriate deduction to take based on their net pay. With each deduction, the value in “Outstanding Balance” will reduce (updated when you calculate pay or save variations). Once this reaches zero the attachment will automatically stop.
Deduction Earnings Order Child Support Agency (DEO)
On the employees’ AEO tab:
• Select the “DEO (CSA)” AEO type.
• Highlight the new CSA entry and click “Edit”
• Set the “Issue Date” as per your instruction to make a deduction.
• Type in the “Deduction Amount” as per your instruction to make a deduction.
• Enter the “Employee Reference Number” if known.
• Select the “Agency/Beneficiary” you have set up
• Tick “Admin Fee” if you wish to charge the employee the allowed £1 administration fee.
• Under “Protected Earnings Options” type in the “Normal” value to match the specified value for protected earnings as listed on the instruction to make the deduction.
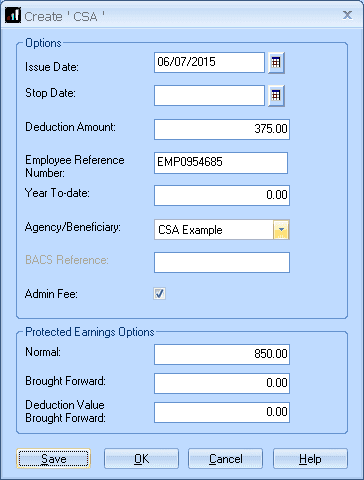
Save these details and continue running payroll as normal. IRIS Payroll will calculate the appropriate deduction based on the value of the deduction up to the protected earnings limit. Any value that cannot be taken due to protected earnings will be saved under “Deductions Value Brought Forward”. Deductions brought forward will be taken when the normal deduction value can be taken in full and the employee hasn’t reached the protected earnings “Normal” value.
If you receive a notification to stop this deduction, return to this screen:
• Set “Stop Date” to match the stop notification you have received.
Deduction Earnings Order Child Support Agency 60% Protected Earnings (DEO – 60% PEP)
On the employees’ AEO tab:
• Select the “DEO (CSA) – % PEP” AEO type.
• Highlight the new CSA entry and click “Edit”
• Set the “Issue Date” as per your instruction to make a deduction.
• Type in the “Deduction Amount” as per your instruction to make a deduction.
• Enter the “Employee Reference Number” if known.
• Select the “Agency/Beneficiary” you have set up
• Tick “Admin Fee” if you wish to charge the employee the allowed £1 administration fee.
• Protected earnings will be automatically set as 60% of the employees’ deductible earnings.
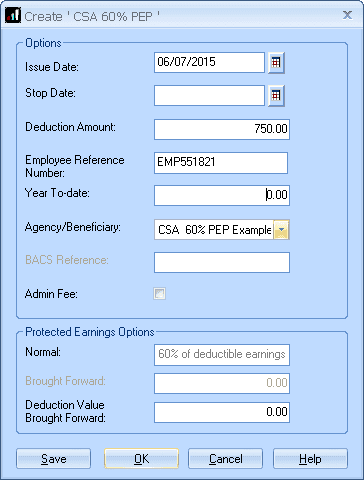
Save these details and continue running payroll as normal. IRIS Payroll will calculate the appropriate deduction based on the value of the deduction up to the protected earnings limit. Any value that cannot be taken due to protected earnings will be saved under “Deductions Value Brought Forward”. Deductions brought forward will be taken when the normal deduction value can be taken in full and the employee hasn’t reached the protected earnings “Normal” value.
If you receive a notification to stop this deduction, return to this screen:
• Set “Stop Date” to match the stop notification you have received.
Direct Earnings Attachment (DEA)
On the employees’ AEO tab:
• Select the “DEA” AEO type.
• Highlight the new DEA entry and click “Edit”
• Set the “Issue Date” as per your instruction to make a deduction.
• Set “Original Amount” to the total amount the employee has to repay.
• Set “Outstanding Balance” to the amount the employee has left to pay (when setting up a new AEO “Original Amount” and “Outstanding Balance” will normally be the same.)
• Select the “Agency/Beneficiary” you have set up
• Tick “Admin Fee” if you wish to charge the employee the allowed £1 administration fee.
• Protected earnings will be automatically set as 60% of the employees’ deductible earnings.
• IRIS Payroll will use the following % tier selection (Rates for 19/20 are the same since 16/17):
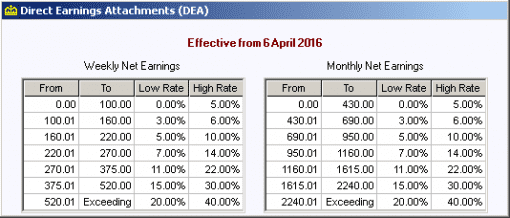
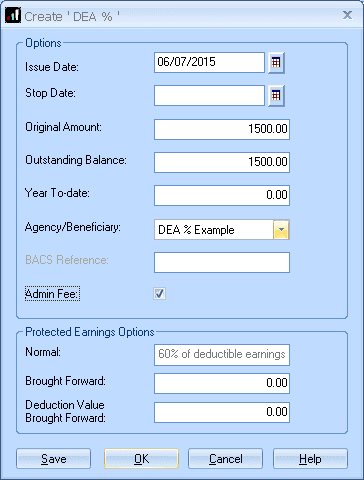
Save these details and continue running payroll as normal. IRIS Payroll will calculate the appropriate deduction based on the appropriate % tier up to the protected earnings limit. Any value that cannot be taken due to protected earnings will be saved under “Deductions Value Brought Forward”. Deductions brought forward will be taken when the normal deduction value can be taken in full and the employee hasn’t reached the protected earnings “Normal” value. With each deduction the value in “Outstanding Balance” will reduce (updated when you calculate payroll or save variations). Once this reaches zero the attachment will automatically stop.
Earnings Arrestment (EAO Scottish)
On the employees’ AEO tab:
• Select the “Earnings Arrestment (Scotland)” AEO type.
• Highlight the new EAO entry and click “Edit”
• Set the “Issue Date” as per your instruction to make a deduction.
• Set “Original Amount” to the total amount the employee has to repay.
• Set “Outstanding Balance” to the amount the employee has left to pay (when setting up a new AEO “Original Amount” and “Outstanding Balance” will normally be the same.)
• Select the “Agency/Beneficiary” you have set up
• Tick “Admin Fee” if you wish to charge the employee the allowed £1 administration fee.
• IRIS Payroll will use the following % tier selection (Rate for 19/20 are the same since 16/17):
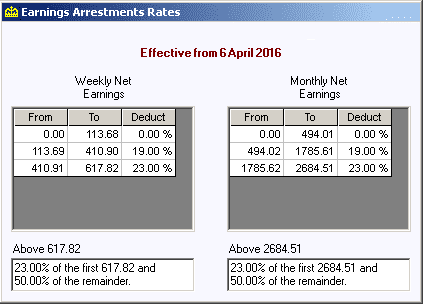
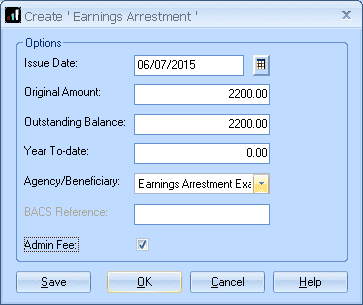
Save these details and continue running payroll as normal. IRIS Payroll will calculate the appropriate deduction to take based on their net pay. With each deduction, the value in “Outstanding Balance” will reduce (updated when you calculate payroll or save variations). Once this reaches zero the attachment will automatically stop.
Fines (Fixed Deduction AEO)
On the employees’ AEO tab:
• Select the “Fines (Fixed Deduction AEO)” type
• Highlight the new fines entry and click “Edit”
• Set the “Issue Date” as per your instruction to make a deduction.
• Set “Original Amount” to the total amount the employee has to repay.
• Set “Outstanding Balance” to the amount the employee has left to pay (when setting up a new AEO “Original Amount” and “Outstanding Balance” will normally be the same.)
• Select the “Agency/Beneficiary” you have set up
• Tick “Admin Fee” if you wish to charge the employee the allowed £1 administration fee.
• IRIS Payroll will use the following % tier selection (Rate for 19/20 are the same since 16/17):
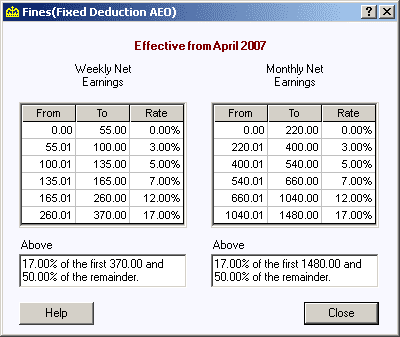
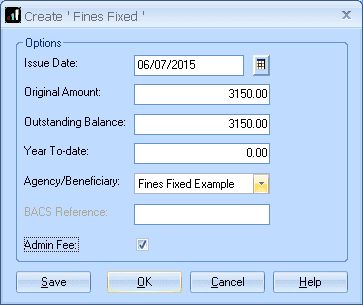
Save these details and continue running payroll as normal. IRIS Payroll will calculate the appropriate deduction to take based on their net pay. With each deduction, the value in “Outstanding Balance” will reduce (updated when you calculate payroll or save variations). Once this reaches zero the attachment will automatically stop.
Priority Order
On the employees’ AEO tab:
• Select the “Priority Order” AEO type.
• Highlight the new entry and click “Edit”
• Set the “Issue Date” as per your instruction to make a deduction.
• Enter the “Deduction Amount” as per your instruction to make a deduction.
• If you have been supplied with a fixed amount for the employee to repay, tick “Use Outstanding Balance” to active the “Original Amount” and “Outstanding Balance” fields. If left unticked this will be an ongoing deduction.
• Select the “Agency/Beneficiary” you have set up.
• Tick “Admin Fee” if you wish to charge the employee the allowed £1 administration fee.
• Under “Protected Earnings Options” type in the “Normal” value to match the specified value for protected earnings as listed on the instruction to make the deduction.
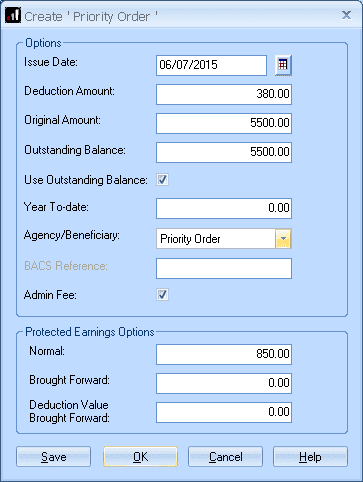
Save these details and continue running payroll as normal. IRIS Payroll will calculate the appropriate deduction based on the value of the deduction up to the protected earnings limit. Any value that cannot be taken due to protected earnings will be saved under “Deduction Value Brought Forward”. Deductions brought forward will be taken when the normal deduction value can be taken in full and the employee hasn’t reached the protected earnings “Normal” value. With each deduction, the value in “Outstanding Balance” will reduce (updated when you calculate payroll or save variations). Once this reaches zero the attachment will automatically stop.
Non-Priority Order
On the employees’ AEO tab:
• Select the “Non-Priority Order” AEO type.
• Highlight the new entry and click “Edit”
• Set the “Issue Date” as per your instruction to make a deduction.
• Enter the “Deduction Amount” as per your instruction to make a deduction.
• If you have been supplied with a fixed amount for the employee to repay, tick “Use Outstanding Balance” to active the “Original Amount” and “Outstanding Balance” fields. If left unticked this will be an ongoing deduction.
• Select the “Agency/Beneficiary” you have set up.
• Tick “Admin Fee” if you wish to charge the employee the allowed £1 administration fee.
• Under “Protected Earnings Options” type in the “Normal” value to match the specified value for protected earnings as listed on the instruction to make the deduction.
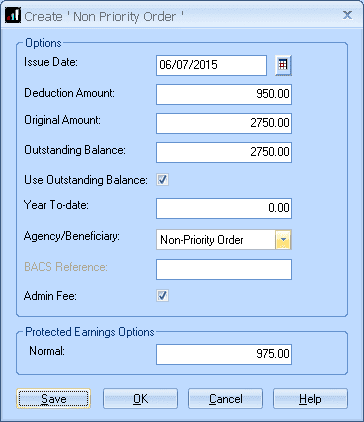
Save these details and continue running payroll as normal. IRIS Payroll will calculate the appropriate deduction based on the value of the deduction up to the protected earnings limit. Any value that cannot be taken due to protected earnings will be ignored. With each deduction the value in “Outstanding Balance” will reduce (updated when you calculate payroll or save variations). Once this reaches zero the attachment will automatically stop.
Charging the Administration Fee
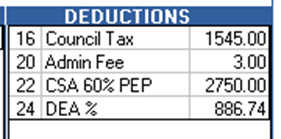
If you wish to charge the employee the £1 administration fee for processing an attachment, as well as ticking the option as shown above, you also need to add to the employee AEO tab the “Admin Fee” type:

With this option in place, IRIS Payroll will take an additional £1 off the employee per AEO present with the admin fee option ticked:
Reporting on Attachments
There are several reports for employee attachment details. At the employee level you have the “Attachment – Employee Details” and the “Employee AEO & Loan Details“:
Attachment – Employee Details: This report gives you the details for all attachments configured for all employees. This will detail the current state for the description, Issue date, Stop date, regular amount, outstanding balance, protected earnings and YTD value of deductions. This report is available to install from the report manager > employee reports.
Employee AEO & Loan Details: This report will detail the value of deductions for all employees AEO/Loans for the last pay period calculated in the software. This report is available to install from the report manager > employee reports.
If you require a multi-period report detailing AEO deductions we would recommend you use the “Multi-Period Payment/Deduction Summary“. This report is available to install from the report manager > multi period reports. When you produce the Multi-Period Payment/Deduction Summary you can choose an individual deduction or just leave the default setting “ALL“. You can also set a start and end period to gather the deduction over several pay periods.
For more details on working with the Report Manager click here.
We are sorry you did not find this KB article helpful. Please use the box below to let us know how we can improve it.
